Red Hat Ceph Storage Stretch Cluster With Arbiter Deployment
1. Overview
Red Hat Ceph Storage (RHCS) is an open-source enterprise platform that provides unified software-defined storage on standard, economical servers and disks.With block, object, and file storage combined into one platform, Red Hat Ceph Storage efficiently and automatically manages all your data, so you can focus on the applications and workloads that use it.
This guide, will explain how to properly set up a Red Hat Ceph Storage 5 cluster deployed on two different datacenters using the stretched mode functionality.
Also, RHCS provides other advanced characteristics like:
-
Decouples software from hardware to run cost-effectively on industry-standard servers and disks.
-
Scales flexibly and massively to support multiple petabyte deployments with consistent performance.
-
Provides web-scale object storage for modern use cases, such as cloud infrastructure, media repository, and big data analytics.
-
Combines the most stable version of Ceph with a storage management console, deployment tools, and support services.
-
Object, block, and file storage.
-
Compatibility with Amazon S3 object application programming interface (API), OpenStack Swift, NFS v4, or native API protocols.
-
Block storage integrated with OpenStack, Linux, and KVM hypervisor.
-
Validated with Apache Hadoop S3A filesystem client.
-
Multi-site and disaster recovery options.
-
Flexible storage policies.
-
Data durability via erasure coding or replication.
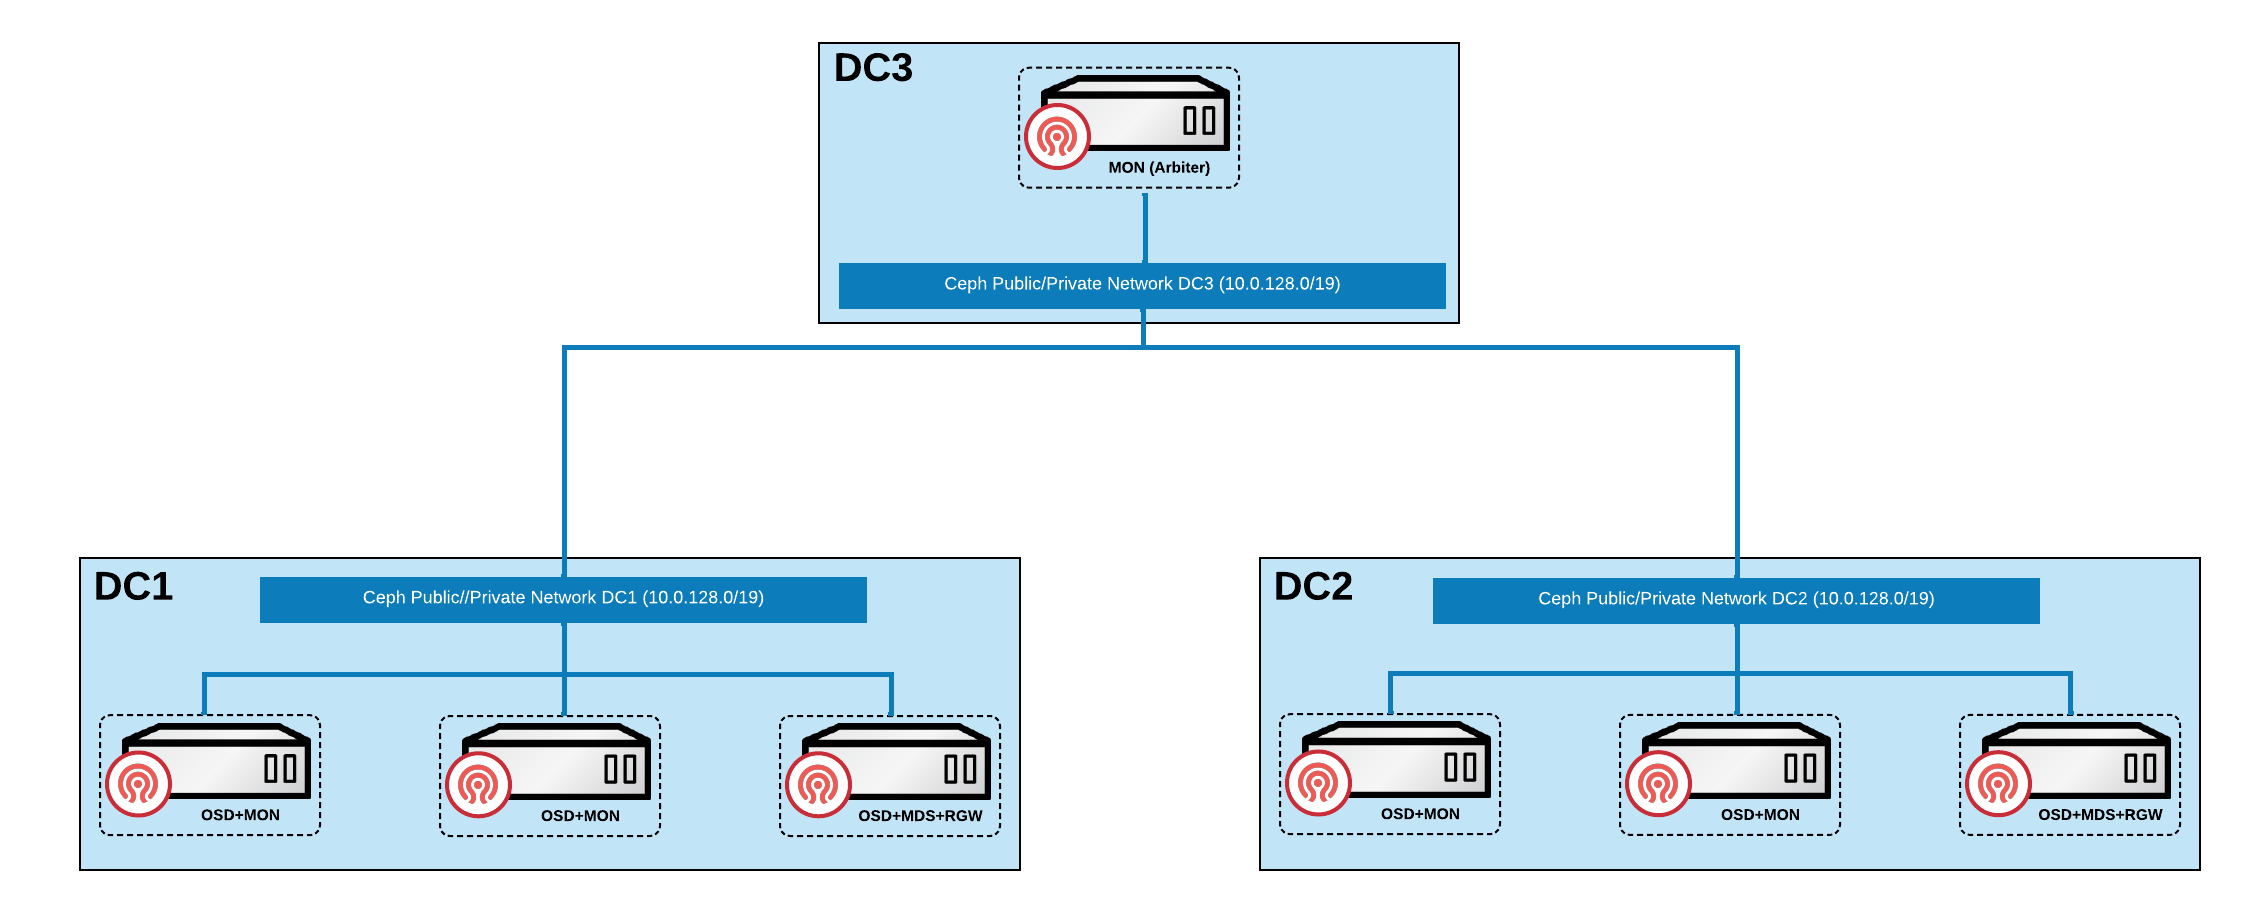
In the diagram depicted below, we can see a graphical representation of the RHCS architecture that will be used in this guide:
2. RHCS stretch mode introduction
When the stretch mode is enabled, the OSDs will only take PGs active when they peer across datacenters, assuming both are alive with the following constraints:
-
Pools will increase in size from the default 3 to 4, expecting two copies on each site.
-
OSDs will only be allowed to connect to monitors in the same datacenter.
-
New monitors will not join the cluster if they do not specify a location.
If all the OSDs and monitors from a datacenter become inaccessible at once, the surviving datacenter will enter a degraded stretch mode which implies:
-
This will issue a warning, reduce the pool’s
min_sizeto 1, and allow the cluster to go active with data in the remaining site. -
The pool
sizeparameter is not changed, so you will also get warnings that the pools are too small. -
Although, the stretch mode flag will prevent the OSDs from creating extra copies in the remaining datacenter (so it will only keep two copies, as before).
When the missing datacenter comes back, the cluster will enter recovery stretch mode triggering the following actions:
-
This changes the warning and allows peering but still only requires OSDs from the datacenter, which was up the whole time.
-
When all PGs are in a known state and are neither degraded nor incomplete, the cluster transitions back to the regular stretch mode where:
-
The cluster ends the warning.
-
Restores
min_sizeto its starting value (2) and requires both sites to peer. -
Stops requiring the always-alive site when peering (so that you can failover to the other site, if necessary).
-
3. Requirements for deploying Red Hat Ceph Storage stretch cluster with arbiter
Red Hat Ceph Storage (RHCS) is an open-source enterprise platform that provides unified software-defined storage on standard, economical servers and disks. With block, object, and file storage combined into one platform, Red Hat Ceph Storage efficiently and automatically manages all your data, so you can focus on the applications and workloads that use it.
This section provides a basic overview of the RHCS deployment. For more complex deployment, refer to the official documentation guide for RHCS 5.
Only Flash media is supported since it runs with min_size=1 when degraded. Use stretch mode only with all-flash OSDs. Using all-flash OSDs minimizes the time needed to recover once connectivity is restored, thus minimizing the potential for data loss. Erasure coded pools cannot be used with stretch mode.
|
| Erasure coded pools cannot be used with stretch mode. |
| Custom CRUSH rules providing two copies in each site (using 4 copies) must be created when configuring the stretch mode in the Ceph cluster. |
3.1. Hardware requirements
For information on minimum hardware requirements for deploying Red Hat Ceph Storage, see hardware recommendations for containerized Ceph.
Physical server locations and Ceph component layout for Red Hat Ceph Storage cluster deployment.
| Node name | Datacenter | Ceph components |
|---|---|---|
ceph1 |
DC1 |
OSD+MON+MGR |
ceph2 |
DC1 |
OSD+MON |
ceph3 |
DC1 |
OSD+MDS+RGW |
ceph4 |
DC2 |
OSD+MON+MGR |
ceph5 |
DC2 |
OSD+MON |
ceph6 |
DC2 |
OSD+MDS+RGW |
ceph7 |
DC3 |
MON |
3.2. Software Details
Use the latest software version of RHCS 5. See the knowledgebase article on Red Hat Ceph Storage: Supported configurations.
3.3. Network Configurations
The recommended Red Hat Ceph Storage configuration is as follows: You must have two separate networks, one public network and one private network. You must have three different datacenters with L2 or L3 connectivity between all the nodes that form the Ceph cluster.
| You can use different subnets for each of the datacenters. |
Here is an example of a basic network configuration that we have used in this guide:
-
DC1: Ceph public/private network: 10.40.0.0/24
-
DC2: Ceph public/private network: 10.40.0.0/24
-
DC3: Ceph public/private network: 10.40.0.0/24
For more information on the required network environment, see Ceph network configuration.
4. Node Pre-Deployment Requirements
Before installing the RHCS Ceph cluster, we need to perform the following steps to fulfil all the requirements needed:
4.1. Repositories and packages
-
Register all the nodes to the Red Hat Network or Red Hat Satellite and subscribe to a valid pool:
subscription-manager register subscription-manager subscribe --pool=8a8XXXXXX9e0 -
All nodes in the Ceph cluster need access to the following repositories:
-
rhel-8-for-x86_64-baseos-rpms -
rhel-8-for-x86_64-appstream-rpms
subscription-manager repos --disable="*" --enable="rhel-8-for-x86_64-baseos-rpms" --enable="rhel-8-for-x86_64-appstream-rpms"
-
-
Update the Operating system RPMs to the latest version and reboot if needed:
dnf update -y reboot -
Select a node from the cluster to be your bootstrap node.
ceph1is our bootstrap node in this example going forward.Only on the bootstrap node
ceph1, enable theansible-2.9-for-rhel-8-x86_64-rpmsandrhceph-5-tools-for-rhel-8-x86_64-rpmsrepositories:subscription-manager repos --enable="ansible-2.9-for-rhel-8-x86_64-rpms" --enable="rhceph-5-tools-for-rhel-8-x86_64-rpms" -
In all our RHCS hosts, we configure the hostname using the bare/short hostname.
hostnamectl set-hostname <short_name> -
Verify the hostname configuration for deploying Red Hat Ceph Storage with cephadm.
hostnameExample output.ceph1
-
Check the long hostname with the fqdn using the hostname -f option.
hostname -fExample output.ceph1.bkgzv.sandbox762.opentlc.com
-
Install the
cephadm-ansibleRPM package:sudo dnf install -y cephadm-ansibleTo run the ansible playbooks, you must have ssh passwordless access to all the nodes that are part of the Red Hat Ceph Storage cluster. Ensure that the configured user (in our example, deployment-user) has privileges to invoke the sudocommand without needing a password. -
Configure the selected user, in our case
deployment-userssh config file to specify the user and id/key that can be used for connecting to the nodes via ssh:cat <<EOF > ~/.ssh/config Host ceph* User deployment-user IdentityFile ~/.ssh/ceph.pem EOF -
Build our ansible inventory
cat <<EOF > /usr/share/cephadm-ansible/inventory
ceph1
ceph2
ceph3
ceph4
ceph5
ceph6
ceph7
[admin]
ceph1
EOF
Hosts configured as part of the [admin] group on the inventory file will be tagged as _admin by cephadm, so they receive the admin ceph keyring during the bootstrap process -
Verify that ansible can access all nodes using the ping module before running the pre-flight playbook.
ansible -i /usr/share/cephadm-ansible/inventory -m ping all -bExample output.ceph6 | SUCCESS => { "ansible_facts": { "discovered_interpreter_python": "/usr/libexec/platform-python" }, "changed": false, "ping": "pong" } ceph4 | SUCCESS => { "ansible_facts": { "discovered_interpreter_python": "/usr/libexec/platform-python" }, "changed": false, "ping": "pong" } ceph3 | SUCCESS => { "ansible_facts": { "discovered_interpreter_python": "/usr/libexec/platform-python" }, "changed": false, "ping": "pong" } ceph2 | SUCCESS => { "ansible_facts": { "discovered_interpreter_python": "/usr/libexec/platform-python" }, "changed": false, "ping": "pong" } ceph5 | SUCCESS => { "ansible_facts": { "discovered_interpreter_python": "/usr/libexec/platform-python" }, "changed": false, "ping": "pong" } ceph1 | SUCCESS => { "ansible_facts": { "discovered_interpreter_python": "/usr/libexec/platform-python" }, "changed": false, "ping": "pong" } ceph7 | SUCCESS => { "ansible_facts": { "discovered_interpreter_python": "/usr/libexec/platform-python" }, "changed": false, "ping": "pong" } -
The pre-flight Ansible playbook configures the Ceph repository and prepares the storage cluster for bootstrapping. It also installs some prerequisites, such as podman, lvm2, chronyd, and cephadm. The default location for cephadm-ansible and cephadm-preflight.yml is /usr/share/cephadm-ansible.
Run the following ansible-playbook.
ansible-playbook -i /usr/share/cephadm-ansible/inventory /usr/share/cephadm-ansible/cephadm-preflight.yml --extra-vars "ceph_origin=rhcs"
5. Cluster Bootstrapping and service deployment with Cephadm
The cephadm utility installs and starts a single Ceph Monitor daemon and a Ceph Manager daemon for a new Red Hat Ceph Storage cluster on the local node where the cephadm bootstrap command is run.
| For additional information on the bootstrapping process, see Bootstrapping a new storage cluster. |
In this example, with the bootstrap command we will use a service specification file called cluster-spec.yaml to deploy the remaining 6 Nodes into the RHCS cluster and also configure the following RHCS services:
-
Ceph cluster Monitors(MONs) and Managers(MGRs)
Using the spec file in this example, five monitors will get deployed and they will get allocated according to the labels we have specified on each node.
Two managers will get deployed in Active/Passive fashion, Each Manager daemon will be allocated to a different datacenter.
| For additional information on configuring Monitors using the service specification file. See Configure MONs service using service specification file. |
-
Object Storage Devices (OSDs)
Using the spec file in this example, all free disks on the nodes will be used as osds, in this example we have one driver per node, so 7 OSDs will be created, one per each ceph host where ceph7 is the arbiter node which does not have any OSD’s configured.
| For additional information on configuring OSDs using the service specification file. See Configure OSD Advanced filters. |
-
Metadata Services (MDS) required for CephFS
Using the spec file in this example 2 MDS servers will be deployed in Active/Passive, each MDS service will allocated to a different site.
| For additional information on the MDS service spec configuration. See Configure MDS service using service specification file. |
-
Rados Gateway Services(RGW) required for object storage
Using the spec file in this example 2 RGW services will be deployed, listening on port 8080, Will allocate each RGW service to a different datacenter.
| For additional information on the GRW service spec configuration. See Configure RGW service using service specification file. |
| To know more about RGW, see The Ceph Object Gateway. |
Procedure
-
Create json file to authenticate against the container registry using a json file as follows:
cat <<EOF > /root/registry.json { "url":"registry.redhat.io", "username":"User", "password":"Pass" } EOF -
Create a cluster-spec.yaml that adds the nodes to the RHCS cluster and also sets specific labels for where the services should run following table 3.1
cat <<EOF > /root/cluster-spec.yaml service_type: host addr: 10.0.40.78 ## <XXX.XXX.XXX.XXX> hostname: ceph1 ## <ceph-hostname-1> location: root: default datacenter: DC1 labels: - osd - mon - mgr --- service_type: host addr: 10.0.40.35 hostname: ceph2 location: datacenter: DC1 labels: - osd - mon --- service_type: host addr: 10.0.40.24 hostname: ceph3 location: datacenter: DC1 labels: - osd - mds - rgw --- service_type: host addr: 10.0.40.185 hostname: ceph4 location: root: default datacenter: DC2 labels: - osd - mon - mgr --- service_type: host addr: 10.0.40.88 hostname: ceph5 location: datacenter: DC2 labels: - osd - mon --- service_type: host addr: 10.0.40.66 hostname: ceph6 location: datacenter: DC2 labels: - osd - mds - rgw --- service_type: host addr: 10.0.40.221 hostname: ceph7 labels: - mon --- service_type: mon placement: label: "mon" --- service_type: mds service_id: fs_name placement: label: "mds" --- service_type: mgr service_name: mgr placement: label: "mgr" --- service_type: osd service_id: all-available-devices service_name: osd.all-available-devices placement: label: "osd" spec: data_devices: all: true --- service_type: rgw service_id: objectgw service_name: rgw.objectgw placement: count: 2 label: "rgw" spec: rgw_frontend_port: 8080 EOF -
Retrieve the IP for the NIC with the RHCS public network configured from the bootstrap node. After substituting the
10.0.40.0with the subnet you have defined in your ceph public network, you can use the following example command.ip a | grep 10.0.40Example output:
10.0.40.78
-
Run the
Cephadmbootstrap command as the root user on the node that will be the initial Monitor node in the cluster. TheIP_ADDRESSoption is the node’s IP address that you are using to run thecephadm bootstrapcommand.If you have configured a different user than root for passwordless SSH access, use the --ssh-user=flag with the cepadm bootstrap commandcephadm bootstrap --ssh-user=deployment-user --mon-ip 10.0.40.78 --apply-spec /root/cluster-spec.yaml --registry-json /root/registry.jsonIf the local node uses fully-qualified domain names (FQDN), add the --allow-fqdn-hostnameoption to cephadm bootstrap on the command line.Once the bootstrap finishes, you will see the following output from the previous cephadm bootstrap command:
You can access the Ceph CLI with: sudo /usr/sbin/cephadm shell --fsid dd77f050-9afe-11ec-a56c-029f8148ea14 -c /etc/ceph/ceph.conf -k /etc/ceph/ceph.client.admin.keyring Please consider enabling telemetry to help improve Ceph: ceph telemetry on For more information, see: https://docs.ceph.com/docs/pacific/mgr/telemetry/ -
Verify the status of Red Hat Ceph Storage cluster deployment using the ceph cli client from ceph1:
ceph -sExample output.cluster: id: 3a801754-e01f-11ec-b7ab-005056838602 health: HEALTH_OK services: mon: 5 daemons, quorum ceph1,ceph2,ceph4,ceph5,ceph7 (age 4m) mgr: ceph1.khuuot(active, since 5m), standbys: ceph4.zotfsp osd: 12 osds: 12 up (since 3m), 12 in (since 4m) rgw: 2 daemons active (2 hosts, 1 zones) data: pools: 5 pools, 107 pgs objects: 191 objects, 5.3 KiB usage: 105 MiB used, 600 GiB / 600 GiB avail 105 active+cleanIt is normal to get a global recovery event while you don’t have any osds configured. It may take several minutes for all the services to start. You can use ceph orch psandceph orch lsto further check the status of the services -
Verify if all the nodes are part of the cephadm cluster.
ceph orch host lsExample output.HOST ADDR LABELS STATUS ceph1 10.0.40.78 _admin osd mon mgr ceph2 10.0.40.35 osd mon ceph3 10.0.40.24 osd mds rgw ceph4 10.0.40.185 osd mon mgr ceph5 10.0.40.88 osd mon ceph6 10.0.40.66 osd mds rgw ceph7 10.0.40.221 mon
We can run direct ceph commands from the host because we configured ceph1 in the cephadm-ansible inventory as part of the [admin] group, so the ceph admin keys were copied to the host during the cephadm bootstrap process -
Check the current placement of the Ceph monitor services on the datacenters.
ceph orch ps | grep mon | awk '{print $1 " " $2}'Example output.mon.ceph1 ceph1 mon.ceph2 ceph2 mon.ceph4 ceph4 mon.ceph5 ceph5 mon.ceph7 ceph7
-
Check the current placement of the Ceph manager services in the datacenters.
ceph orch ps | grep mgr | awk '{print $1 " " $2}'Example output:mgr.ceph2.ycgwyz ceph2 mgr.ceph5.kremtt ceph5
-
Check the ceph osd crush map layout to ensure that each host has one OSD configured and its status is UP. Also, double-check that each node is under the right datacenter bucket as specified in table 3.1
ceph osd treeExample output.ID CLASS WEIGHT TYPE NAME STATUS REWEIGHT PRI-AFF -1 0.87900 root default -16 0.43950 datacenter DC1 -11 0.14650 host ceph1 2 ssd 0.14650 osd.2 up 1.00000 1.00000 -3 0.14650 host ceph2 3 ssd 0.14650 osd.3 up 1.00000 1.00000 -13 0.14650 host ceph3 4 ssd 0.14650 osd.4 up 1.00000 1.00000 -17 0.43950 datacenter DC2 -5 0.14650 host ceph4 0 ssd 0.14650 osd.0 up 1.00000 1.00000 -9 0.14650 host ceph5 1 ssd 0.14650 osd.1 up 1.00000 1.00000 -7 0.14650 host ceph6 5 ssd 0.14650 osd.5 up 1.00000 1.00000
-
Create and enable a new RBD block pool.
ceph osd pool create rbdpool 32 32
ceph osd pool application enable rbdpool rbd
The number 32 at the end of the command is the number of PGs assigned to this pool, the number of PGs can vary depending on several factors like the number of OSDs in the cluster, expected % used of the pool, etc. You can use the following calculator to help you determine the number of PGs needed: https://access.redhat.com/labs/cephpgc/ -
Verify that the RBD pool has been created.
ceph osd lspools | grep rbdpoolExample output.3 rbdpool
-
Verify that MDS services are active and located one service on each datacenter.
ceph orch ps | grep mdsExample output.mds.cephfs.ceph3.cjpbqo ceph3 running (17m) 117s ago 17m 16.1M - 16.2.9 mds.cephfs.ceph6.lqmgqt ceph6 running (17m) 117s ago 17m 16.1M - 16.2.9
-
Create the CephFS volume.
ceph fs volume create cephfsThe ceph fs volume create command also creates the needed data and meta CephFS pools. For more information, see Configuring and Mounting Ceph File Systems. -
Check the Ceph status to verify how the MDS daemons have been deployed. Ensure that the state is active where
ceph6is the primary MDS for this filesystem and ceph3 is the secondary MDS.ceph fs statusExample output.cephfs - 0 clients ====== RANK STATE MDS ACTIVITY DNS INOS DIRS CAPS 0 active cephfs.ceph6.ggjywj Reqs: 0 /s 10 13 12 0 POOL TYPE USED AVAIL cephfs.cephfs.meta metadata 96.0k 284G cephfs.cephfs.data data 0 284G STANDBY MDS cephfs.ceph3.ogcqkl -
Verify that the RGW services are active and running.
ceph orch ps | grep rgwExample output.rgw.objectgw.ceph3.kkmxgb ceph3 *:8080 running (7m) 3m ago 7m 52.7M - 16.2.9 rgw.objectgw.ceph6.xmnpah ceph6 *:8080 running (7m) 3m ago 7m 53.3M - 16.2.9
6. Configuring Red Hat Ceph Storage stretch cluster
Procedure
-
Check the current election strategy the monitors use with the
ceph mon dumpcommand. By default in a ceph cluster, the connectivity is set to classic.$ ceph mon dump | grep election_strategyExample output.dumped monmap epoch 9 election_strategy: 1
-
Change the monitor election to connectivity.
ceph mon set election_strategy connectivity -
Run the previous ceph mon dump command again to verify the election_strategy value.
$ ceph mon dump | grep election_strategyExample output.dumped monmap epoch 10 election_strategy: 3
To know more about the different election strategies, see Configuring monitor election strategy. -
Set the location for all our Ceph monitors:
ceph mon set_location ceph1 datacenter=DC1 ceph mon set_location ceph2 datacenter=DC1 ceph mon set_location ceph4 datacenter=DC2 ceph mon set_location ceph5 datacenter=DC2 ceph mon set_location ceph7 datacenter=DC3 -
Verify that each monitor has its appropriate location.
ceph mon dumpExample output.epoch 17 fsid dd77f050-9afe-11ec-a56c-029f8148ea14 last_changed 2022-03-04T07:17:26.913330+0000 created 2022-03-03T14:33:22.957190+0000 min_mon_release 16 (pacific) election_strategy: 3 0: [v2:10.0.143.78:3300/0,v1:10.0.143.78:6789/0] mon.ceph1; crush_location {datacenter=DC1} 1: [v2:10.0.155.185:3300/0,v1:10.0.155.185:6789/0] mon.ceph4; crush_location {datacenter=DC2} 2: [v2:10.0.139.88:3300/0,v1:10.0.139.88:6789/0] mon.ceph5; crush_location {datacenter=DC2} 3: [v2:10.0.150.221:3300/0,v1:10.0.150.221:6789/0] mon.ceph7; crush_location {datacenter=DC3} 4: [v2:10.0.155.35:3300/0,v1:10.0.155.35:6789/0] mon.ceph2; crush_location {datacenter=DC1} -
Create a CRUSH rule that makes use of the OSD crush topology by installing the ceph-base RPM package in order to use the crushtool command:
dnf -y install ceph-baseTo know more about CRUSH ruleset, see Ceph CRUSH ruleset.
-
Get the compiled CRUSH map from the cluster:
ceph osd getcrushmap > /etc/ceph/crushmap.bin -
Decompile the CRUSH map and convert it to a text file in order to be able to edit it:
crushtool -d /etc/ceph/crushmap.bin -o /etc/ceph/crushmap.txt -
Add the following rule to the CRUSH map by editing the text file /etc/ceph/crushmap.txt at the end of the file.
vim /etc/ceph/crushmap.txt

...
rule stretch_rule {
        id 1
        type replicated
        min_size 1
        max_size 10
        step take DC1
        step chooseleaf firstn 2 type host
        step emit
        step take DC2
        step chooseleaf firstn 2 type host
        step emit
}

# end crush map
The rule
idhas to be unique in our case we only have one more crush rule with id 0 that is why we are using id 1, if your deployment has more rules created, please use the next free id.The CRUSH rule we have declared contains the following information:
-
Rule name:-
Description: A unique whole name for identifying the rule.
-
Value:
stretch_rule
-
-
id:-
Description: A unique whole number for identifying the rule.
-
Value:
1
-
-
type:-
Description: Describes a rule for either a storage drive replicated or erasure-coded.
-
Value:
replicated
-
-
min_size:-
Description: If a pool makes fewer replicas than this number, CRUSH will not select this rule.
-
Value:
1
-
-
max_size:-
Description: If a pool makes more replicas than this number, CRUSH will not select this rule.
-
Value:
10
-
-
step take DC1-
Description: Takes a bucket name (DC1), and begins iterating down the tree.
-
-
step chooseleaf firstn 2 type host-
Description: Selects the number of buckets of the given type, in this case is two different hosts located in DC1.
-
-
step emit-
Description: Outputs the current value and empties the stack. Typically used at the end of a rule, but may also be used to pick from different trees in the same rule.
-
-
step take DC2-
Description: Takes a bucket name (DC2), and begins iterating down the tree.
-
-
step chooseleaf firstn 2 type host-
Description: Selects the number of buckets of the given type, in this case, is two different hosts located in DC2.
-
-
step emit-
Description: Outputs the current value and empties the stack. Typically used at the end of a rule, but may also be used to pick from different trees in the same rule.
-
-
-
Compile the new CRUSH map from the file /etc/ceph/crushmap.txt and convert it to a binary file called /etc/ceph/crushmap2.bin:
crushtool -c /etc/ceph/crushmap.txt -o /etc/ceph/crushmap2.bin -
Inject the new crushmap we created back into the cluster:
ceph osd setcrushmap -i /etc/ceph/crushmap2.binExample output.17
The number 17 is a counter and it will increase (18,19, and so on) depending on the changes you make to the crush map -
Verify that the stretched rule created is now available for use.
ceph osd crush rule lsExample output.replicated_rule stretch_rule
-
Enable stretch cluster mode
ceph mon enable_stretch_mode ceph7 stretch_rule datacenterIn this example,
ceph7is the arbiter node,stretch_ruleis the crush rule we created in the previous step anddatacenteris the dividing bucket.Verify all our pools are using the
stretch_ruleCRUSH rule we have created in our Ceph cluster:for pool in $(rados lspools);do echo -n "Pool: ${pool}; ";ceph osd pool get ${pool} crush_rule;doneExample output.Pool: device_health_metrics; crush_rule: stretch_rule Pool: cephfs.cephfs.meta; crush_rule: stretch_rule Pool: cephfs.cephfs.data; crush_rule: stretch_rule Pool: .rgw.root; crush_rule: stretch_rule Pool: default.rgw.log; crush_rule: stretch_rule Pool: default.rgw.control; crush_rule: stretch_rule Pool: default.rgw.meta; crush_rule: stretch_rule Pool: rbdpool; crush_rule: stretch_rule
This indicates that a working Red Hat Ceph Storage stretched cluster with arbiter mode is now available.