At-rest and PersistentVolume encryption with an external KMS
1. Overview
The intent of this guide is to detail the steps and commands necessary to configure OpenShift Data Foundation (ODF) 4.9 to enable the use of an HashiCorp Vault instance for storing the at-rest or PersistentVolume encryption keys.
The necessary components are one OCP 4.9 (or greater) clusters and the OpenShift Data
Foundation (ODF) operator installed with version 4.9 (or greater).
Encryption at rest can be used to provide protection against the following threats:
-
Cluster wide encryption to protect the organization against device theft (all server or single device)
-
PV level encryption to guarantee isolation and confidentiality between tenants (applications).
-
Combined PV level encryption on top of cluster-wide encryption to offer both protections above at the same time
Starting April 2021, OpenShift Container Storage (OCS) has been rebranded
to OpenShift Data Foundation (ODF).
|
The deployment will follow these high-level steps:
-
Deploy HashiCorp Vault.
Deploy Hashicorp Vault inside of your cluster in a HA mode. -
Install ODF 4.9.
With cluster-wide and PV-level encryption -
Create your Storage Cluster.
Deploy your storage cluster pointing to HashiCorp Vault to provide cluster wide at-rest encryption. -
Deploy an application with PV encryption.
Deploy your application by pointing to HashiCorp Vault to provide PersistentVolume granular at-rest encryption.
2. HashiCorp Vault deployment & configuration
2.1. Installation
Hashicorp recommends using the Helm chart to install Vault in Openshift. Their documentation is available here: www.vaultproject.io/docs/platform/k8s/helm/openshift
These steps mainly consists of adding their helm repo and installing it on your cluster.
Make sure you are logged in to your target cluster, then create your target namespace to deploy vault:
oc new-project vaultNow using project "vault" on server "https://api.cluster0.aws.ocp.team:6443".
You can add applications to this project with the 'new-app' command. For example, try:
oc new-app rails-postgresql-example
to build a new example application in Ruby. Or use kubectl to deploy a simple Kubernetes application:
kubectl create deployment hello-node --image=k8s.gcr.io/serve_hostnameThen install the Hashicorp helm repo
helm repo add hashicorp https://helm.releases.hashicorp.com"hashicorp" has been added to your repositoriesAnd proceed to deploy a Production-ready HA Vault instance in your cluster
helm install vault hashicorp/vault \
                    --set='global.openshift=true' \
                    --set='server.ha.enabled=true' \
--set='server.ha.raft.enabled=true'NAME: vault
LAST DEPLOYED: Thu Mar 3 09:39:37 2022
NAMESPACE: vault
STATUS: deployed
REVISION: 1
NOTES:
Thank you for installing HashiCorp Vault!
Now that you have deployed Vault, you should look over the docs on using
Vault with Kubernetes available here:
https://www.vaultproject.io/docs/
Your release is named vault. To learn more about the release, try:
$ helm status vault
$ helm get manifest vaultNow you should see 4 Pods starting to appear in the vault namespace. Let’s initialize the Vault. This will give us the Root Token and the unseal keys.
| Make sure to save the output of the following command. If you lose the keys, you will not be able to recover your data. |
oc exec -ti vault-0 -- vault operator initUnseal Key 1: +nJfbHXXXXXXXXX
Unseal Key 2: l+DUOmXXXXXXXXX
Unseal Key 3: SnoGWZXXXXXXXXX
Unseal Key 4: wlDiQgXXXXXXXXX
Unseal Key 5: Get307XXXXXXXXX
Initial Root Token: s.t1yXXXXXXXXXXXXXX
Vault initialized with 5 key shares and a key threshold of 3. Please securely
distribute the key shares printed above. When the Vault is re-sealed,
restarted, or stopped, you must supply at least 3 of these keys to unseal it
before it can start servicing requests.
Vault does not store the generated master key. Without at least 3 keys to
reconstruct the master key, Vault will remain permanently sealed!
It is possible to generate new unseal keys, provided you have a quorum of
existing unseal keys shares. See "vault operator rekey" for more information.In order to use Vault, we will need to init and unseal each of the three Vault servers. We will do so in the next chapter
2.2. Starting HashiCorp Vault
By now you should see 4 Pods. Three of those Pods are Running, but not ready
NAME                                    READY   STATUS    RESTARTS   AGE
vault-0                                 0/1     Running   0          36m
vault-1                                 0/1     Running   0          112m
vault-2                                 0/1     Running   0          39m
vault-agent-injector-5bd747fdd6-dp24b   1/1     Running   0          37m
That is because we have not unsealed them yet. You will have to do this every time the Vault Pod is restarted. This includes OpenShift upgrades. During a rolling reboot, you will have to unseal each Vault as the nodes come back up or the upgrade is interrupted by Vault’s poddisruptionbudget.
| Every time a Vault server is restarted, you will need to unseal it |
|
It is possible to auto-unseal Vault during cluster reboots and upgrades. To learn how, check out the tutorials here: learn.hashicorp.com/collections/vault/auto-unseal This does not remove the need to manually unseal Vault once after the initialization. |
oc exec -ti vault-0 -- vault operator unsealUnseal Key (will be hidden):
Key Value
--- -----
Seal Type shamir
Initialized true
Sealed true
Total Shares 5
Threshold 3
Unseal Progress 1/3
Unseal Nonce cdfd99b7-5a21-4113-b0ef-c99b8417aac6
Version 1.9.2
Storage Type raft
HA Enabled true
Repeat the above until Sealed is marked as false!
|
oc exec -ti vault-0 -- vault operator unsealUnseal Key (will be hidden):
Key Value
--- -----
Seal Type shamir
Initialized true
Sealed false
Total Shares 5
Threshold 3
Version 1.9.2
Storage Type raft
Cluster Name vault-cluster-09d60b36
Cluster ID 145ec6b9-47ef-8aa7-aa3f-9a9d1ca40554
HA Enabled true
HA Cluster n/a
HA Mode standby
Active Node Address <none>
Raft Committed Index 25
Raft Applied Index 25Now proceed with the next Vault Pod and configure it to connect to the first Vault Pod
oc exec -ti vault-1 -- vault operator raft join http://vault-0.vault-internal:8200Key Value
--- -----
Joined trueThen proceed with unsealing this Pod
oc exec -ti vault-1 -- vault operator unsealUnseal Key (will be hidden):
Key Value
--- -----
Seal Type shamir
Initialized true
Sealed true
Total Shares 5
Threshold 3
Unseal Progress 1/3
Unseal Nonce cdfd99b7-5a21-4113-b0ef-c99b8417aac6
Version 1.9.2
Storage Type raft
HA Enabled true
Repeat the above until Sealed is marked as false!
|
oc exec -ti vault-1 -- vault operator unsealUnseal Key (will be hidden):
Key Value
--- -----
Seal Type shamir
Initialized true
Sealed false
Total Shares 5
Threshold 3
Version 1.9.2
Storage Type raft
Cluster Name vault-cluster-09d60b36
Cluster ID 145ec6b9-47ef-8aa7-aa3f-9a9d1ca40554
HA Enabled true
HA Cluster n/a
HA Mode standby
Active Node Address <none>
Raft Committed Index 25
Raft Applied Index 25Now proceed with the last Vault Pod and configure it to connect to the first Vault Pod
oc exec -ti vault-2 -- vault operator raft join http://vault-0.vault-internal:8200Key Value
--- -----
Joined trueThen proceed with unsealing this Pod
oc exec -ti vault-2 -- vault operator unsealUnseal Key (will be hidden):
Key Value
--- -----
Seal Type shamir
Initialized true
Sealed true
Total Shares 5
Threshold 3
Unseal Progress 1/3
Unseal Nonce cdfd99b7-5a21-4113-b0ef-c99b8417aac6
Version 1.9.2
Storage Type raft
HA Enabled true
Repeat the above until Sealed is marked as false!
|
oc exec -ti vault-2 -- vault operator unsealUnseal Key (will be hidden):
Key Value
--- -----
Seal Type shamir
Initialized true
Sealed false
Total Shares 5
Threshold 3
Version 1.9.2
Storage Type raft
Cluster Name vault-cluster-09d60b36
Cluster ID 145ec6b9-47ef-8aa7-aa3f-9a9d1ca40554
HA Enabled true
HA Cluster n/a
HA Mode standby
Active Node Address <none>
Raft Committed Index 25
Raft Applied Index 252.3. Create dedicated KV store
Create a dedicated key-value store engine as a receptacle for the ODF keys as they get generated during the deployment of an OSD. Together with the key-value store, create a dedicated security policy and a specific security token to be used by ODF to interact with the vault.
Execute the below commands inside of one of the Vault Pods
oc exec -ti vault-0 -n vault -- shLogin to the Vault instance. Use the Vault Root Token that you created with the unseal keys above.
vault loginToken (will be hidden):
Success! You are now authenticated. The token information displayed below
is already stored in the token helper. You do NOT need to run "vault login"
again. Future Vault requests will automatically use this token.
Key Value
--- -----
token s.t1yyXXXXXXXX
token_accessor qLxxdspcAYQoOnQsgquC6PY2
token_duration ∞
token_renewable false
token_policies ["root"]
identity_policies []
policies ["root"]Create the Key-Value store for OCS encryption keys
vault secrets enable -path=ocs kv-v2Success! Enabled the kv-v2 secrets engine at: ocs/Write a policy that enables ocs users to use that Key-Value store
echo '
  path "ocs/*" {
    capabilities = ["create", "read", "update", "delete", "list"]
  }
  path "sys/mounts" {
  capabilities = ["read"]
}'| vault policy write ocs -Success! Uploaded policy: ocsCreate a token to access this Key-Value store
vault token create -policy=ocs -format json{
"request_id": "dac47681-922e-281a-22c4-7d3964830abc",
"lease_id": "",
"lease_duration": 0,
"renewable": false,
"data": null,
"warnings": null,
"auth": {
"client_token": "s.KZxO1XXXXXXXXXXXXXX",
"accessor": "ZyMMUquPez3Rps4whPLbvoNn",
"policies": [
"default",
"ocs"
],
"token_policies": [
"default",
"ocs"
],
"identity_policies": null,
"metadata": null,
"orphan": false,
"entity_id": "",
"lease_duration": 2764800,
"renewable": true
}
}| At this point your Vault configuration is ready to be used by ODF |
3. Cluster-wide at-rest encryption
In this section you will be using an OCP cluster to deploy ODF 4.9 using OperatorHub. The following will be installed:
-
The ODF Operator
-
The ODF storage cluster (Ceph Pods, NooBaa Pods, StorageClasses)
3.1. Deploy ODF operator
Navigate to the Operators → OperatorHub menu.
Now type openshift container storage in the Filter by keyword… box.
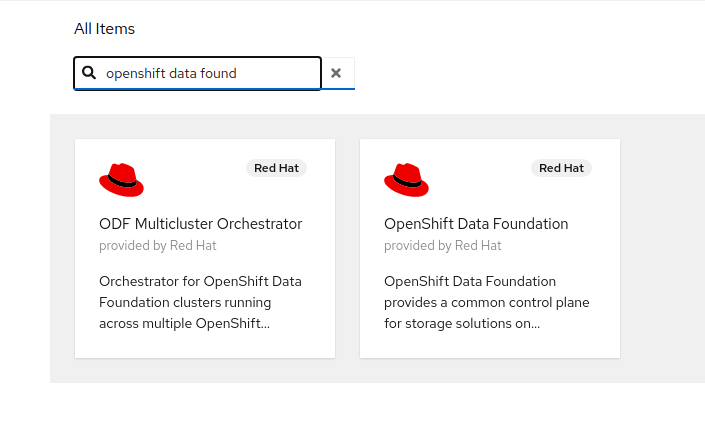
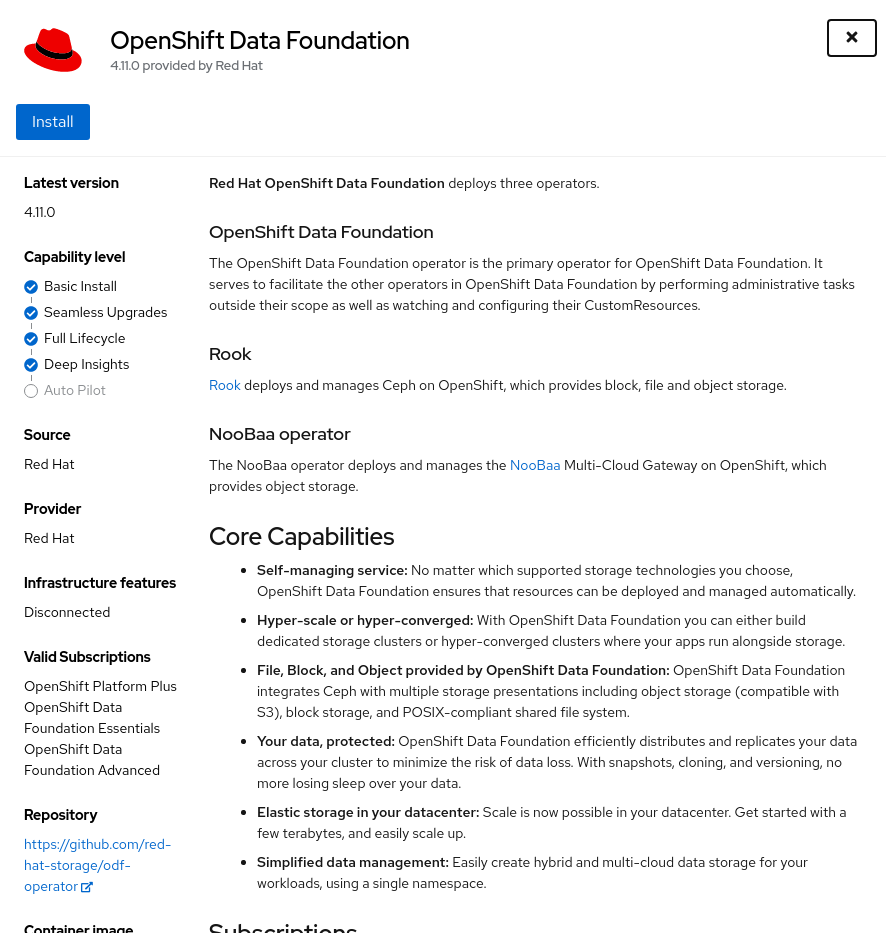
Select OpenShift Container Storage Operator and then select Install.
On the next screen make sure the settings are as shown in this figure.
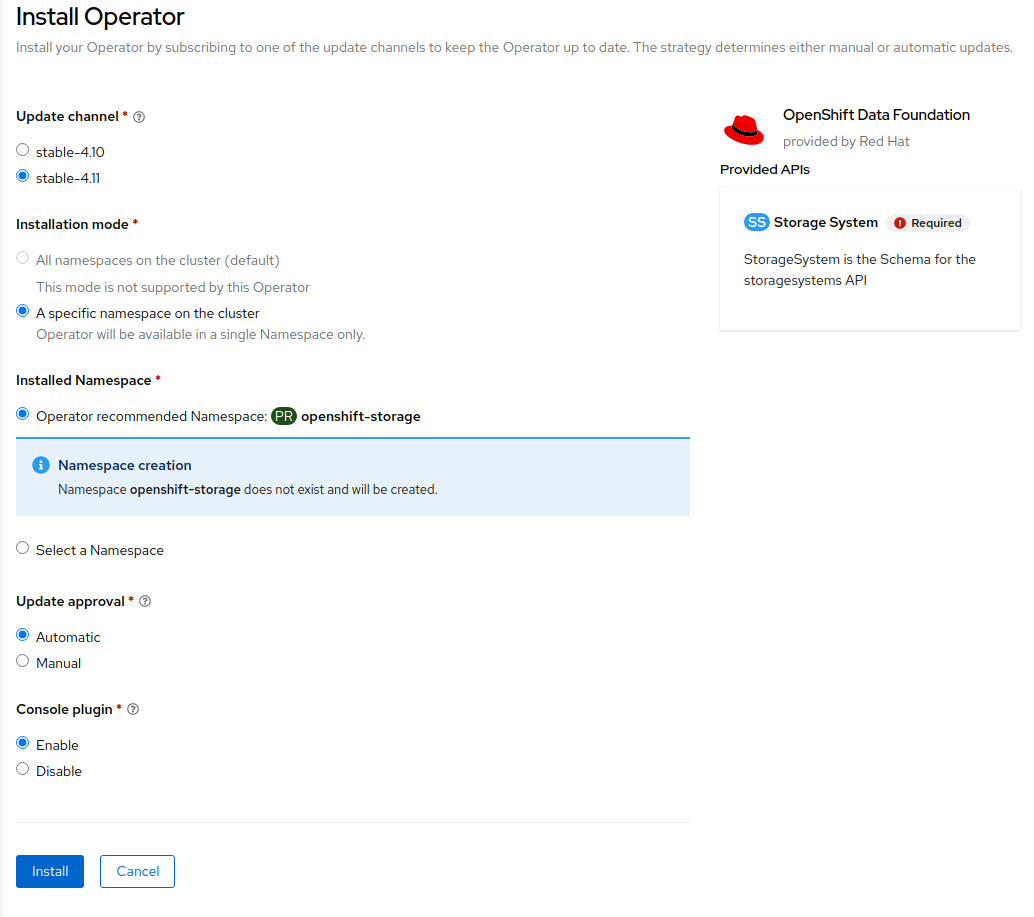
Click Install.
Now you can go back to your terminal window to check the progress of the installation.
watch oc -n openshift-storage get csvNAME DISPLAY VERSION REPLACES PHASE
odf-operator.v4.9.3 OpenShift Data Foundation 4.9.3 odf-operator.v4.9.2 SucceededYou can exit by pressing Ctrl+C.
The resource csv is a shortened word for
clusterserviceversions.operators.coreos.com.
|
Please wait until the operator
This will mark that the installation of your operator was
successful. Reaching this state can take several minutes.
PHASE changes to Succeeded |
You will now also see new operator pods in openshift-storage
namespace:
oc -n openshift-storage get podsNAME READY STATUS RESTARTS AGE
noobaa-operator-698746cd47-sp6w9 1/1 Running 0 108s
ocs-metrics-exporter-78bc44687-pg4hk 1/1 Running 0 107s
ocs-operator-6d99bc6787-d7m9d 1/1 Running 0 108s
rook-ceph-operator-59f7fb95d6-sdjd8 1/1 Running 0 108sNow switch back to your Openshift Web Console for the remainder of the installation for ODF 4.
Select Create Storage Cluster in figure below to get to the ODF configuration screen.
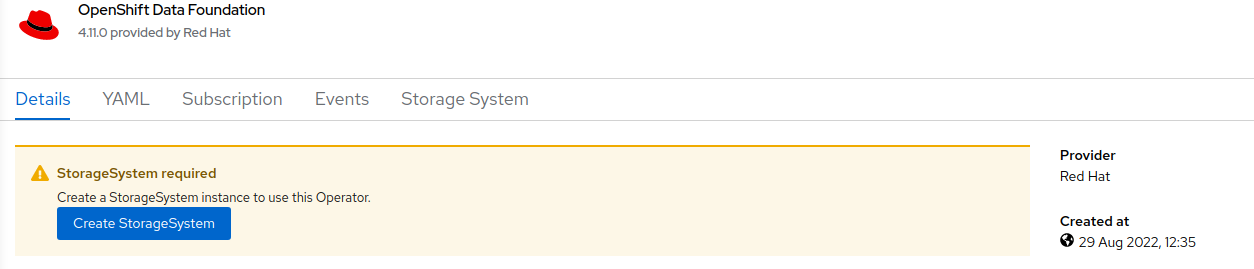
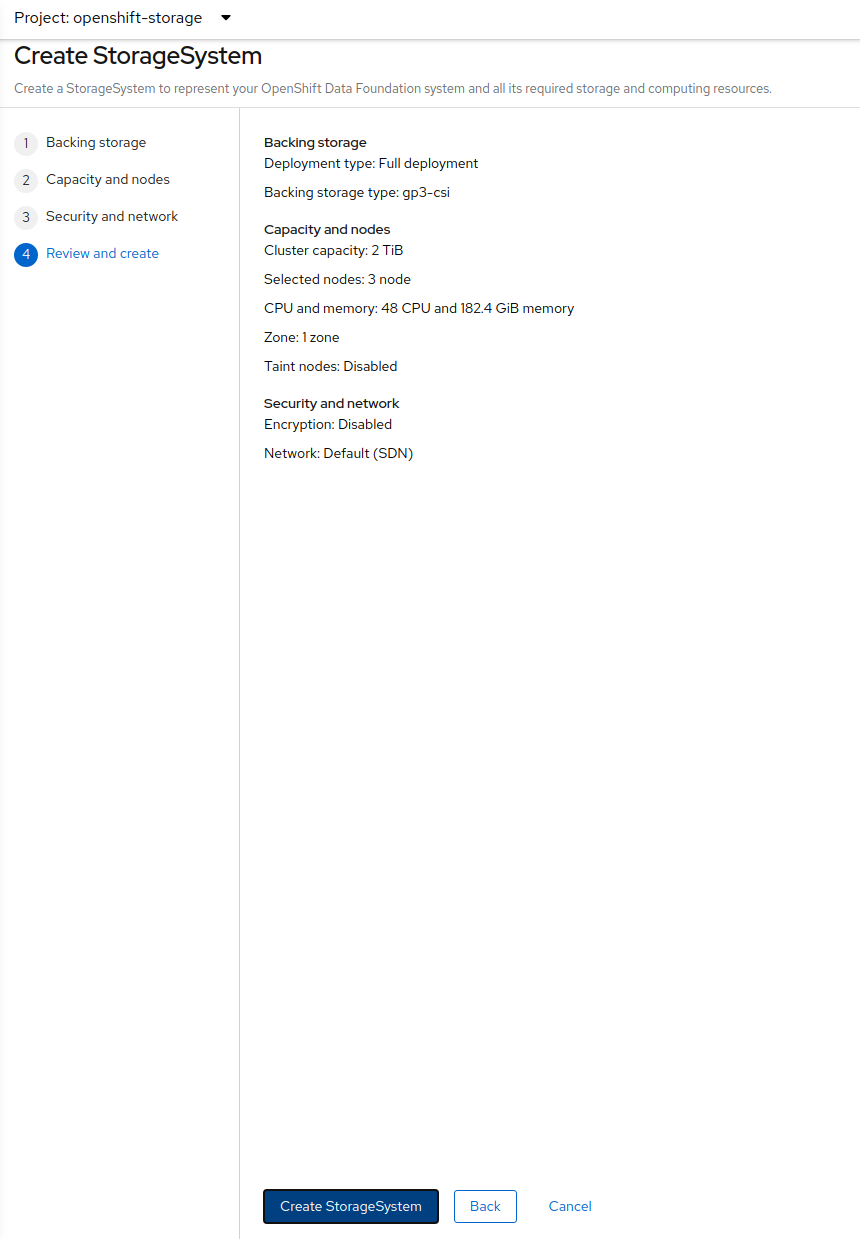
The Create Storage Cluster screen will display.
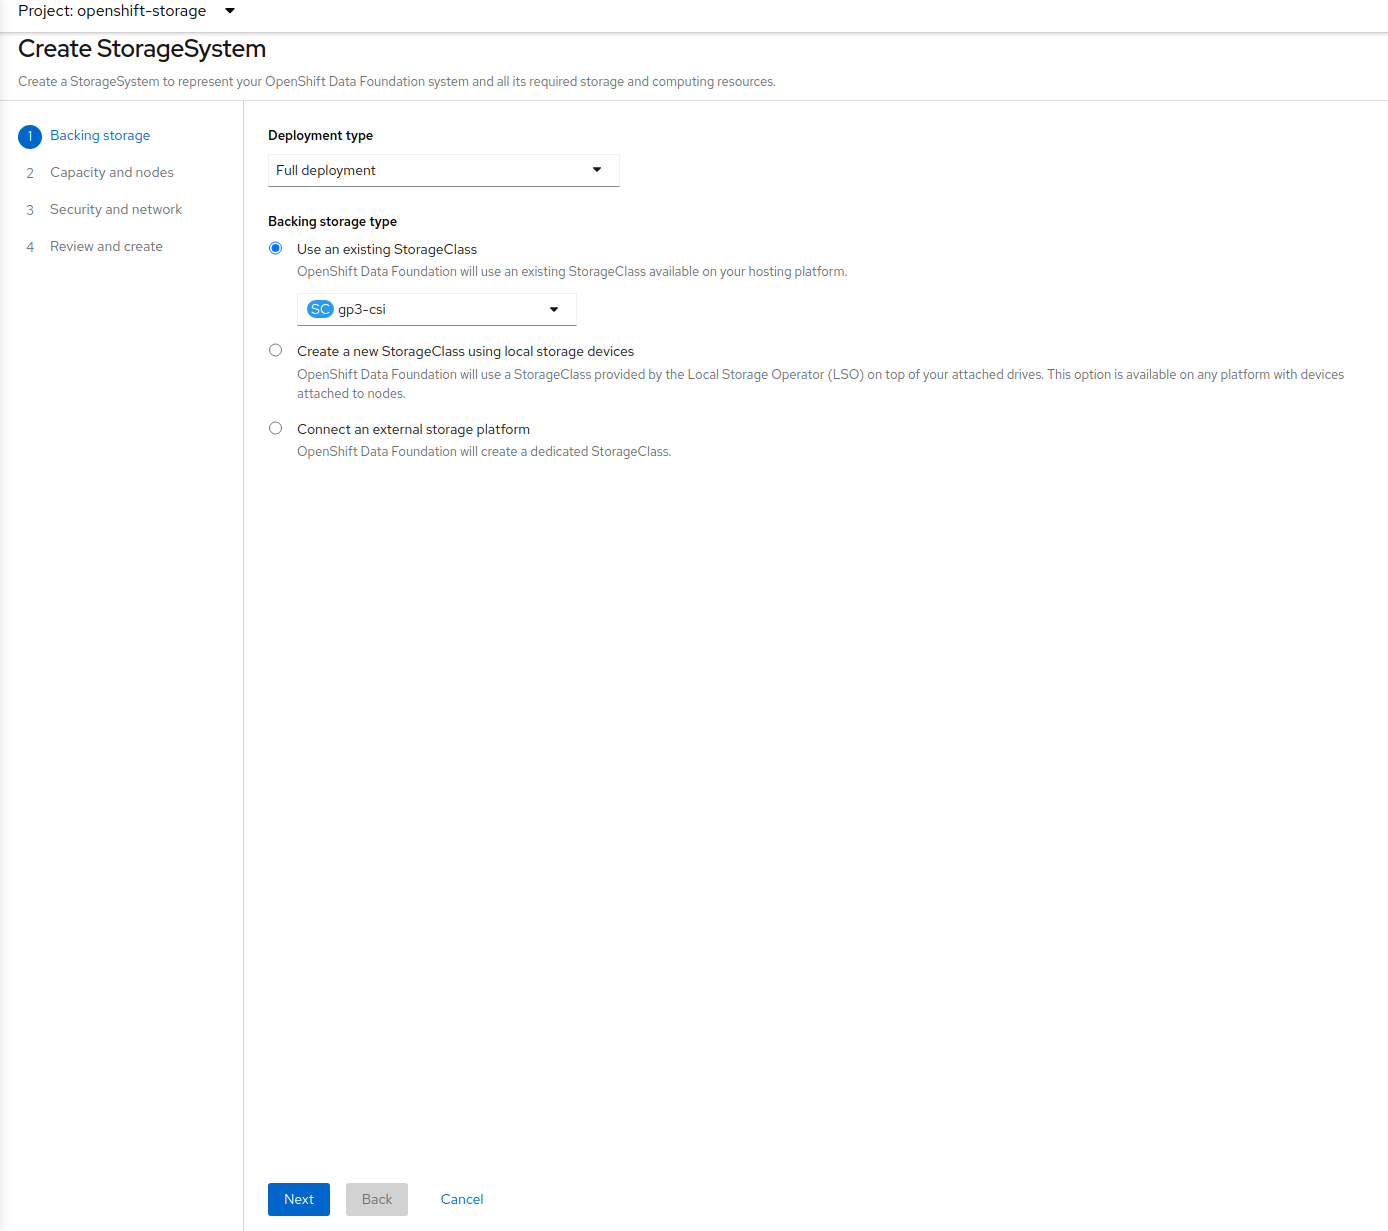
You can leave the default selection of Internal, gp2, 2 TiB.
Select all the nodes that should host ODF Pods and click on Next.
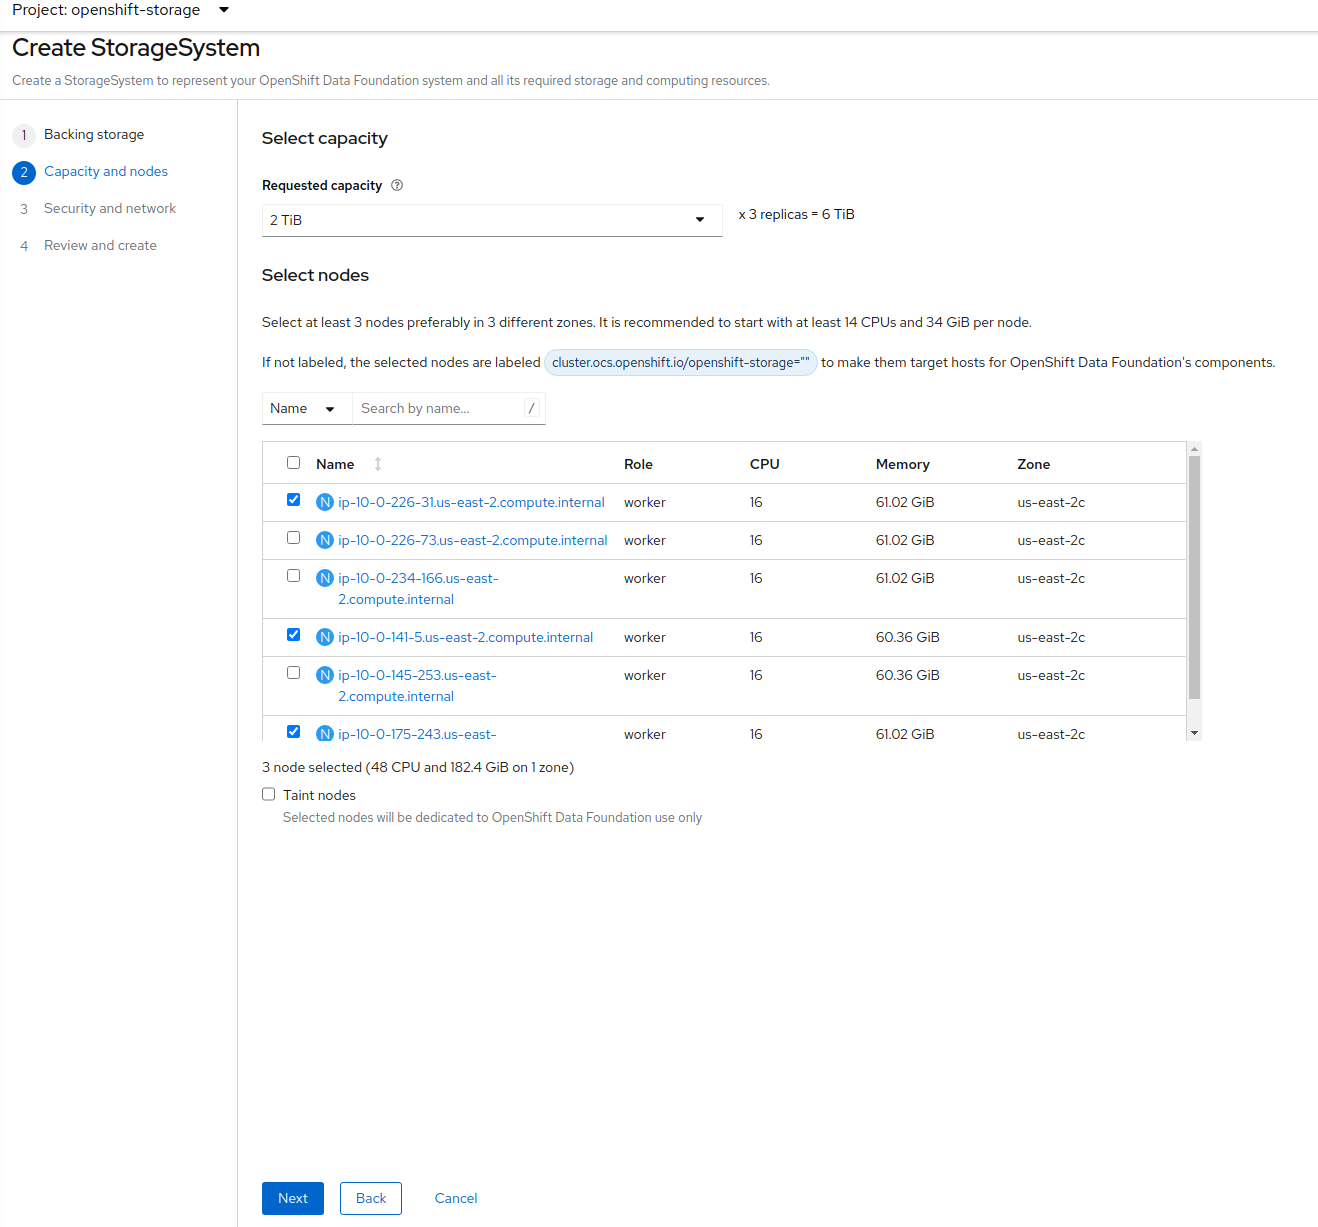
In this screen, check the checkbox at 1.
Then provide a Service name at 2 for your KMS endpoint. This will be used later when creating a Storage Class for encrypting PVs. "vault" is a good default for this, since we are setting up a Vault KMS.
In 3 and 4 supply the address of the Vault cluster. Since we deploy within the cluster, we can use the Service address and the default Vaul Port 8200
In 5 supply the token that you got from the earlier command vault token create -policy=ocs -format json
Then open up the advance settings by clicking on the blue text next to 6.
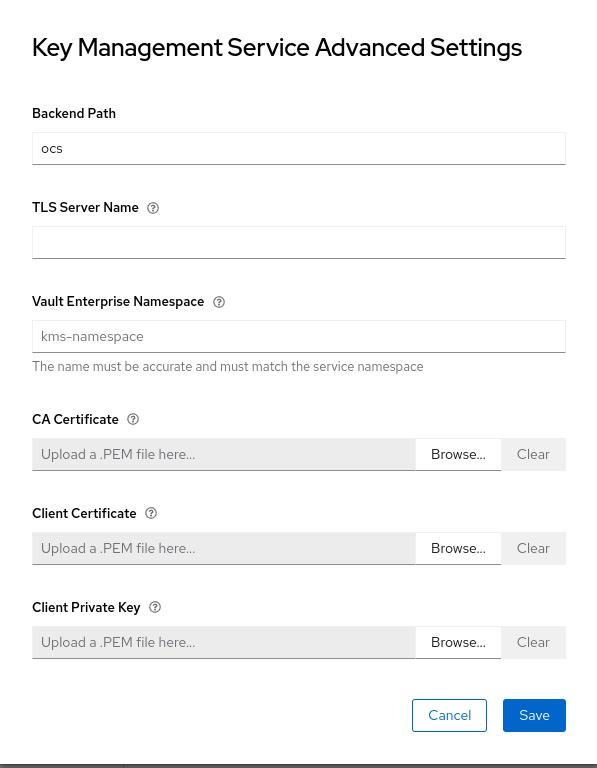
Since we don’t use HTTPs for the Vault communication, all we have to do is set the Backend Path to ocs. All other fields can be left as-is.
Click Create.
You can watch the deployment using the Openshift Web Console by going
back to the Openshift Container Storage Operator screen and selecting All
instances.
Please wait until all Pods are marked as Running in the CLI or until you
see all instances shown below as Ready Status in the Web Console as shown in the following diagram:

3.2. Verify encryption keys
Open a remote shell on one of the Vault Pods
oc exec -ti vault-0 -n vault -- shThen login as the root, using the Token you got when initializing the Vault cluster
vault loginToken (will be hidden):
Success! You are now authenticated. The token information displayed below
is already stored in the token helper. You do NOT need to run "vault login"
again. Future Vault requests will automatically use this token.
Key Value
--- -----
token s.t1yycIXXXXXXXX
token_accessor qLxxdspcAYQoOnQsgquC6PY2
token_duration ∞
token_renewable false
token_policies ["root"]
identity_policies []
policies ["root"]List all Keys in the ocs path.
vault kv list ocsKeys
---
NOOBAA_ROOT_SECRET_PATH/
rook-ceph-osd-encryption-key-ocs-deviceset-gp2-0-data-08p9p4
rook-ceph-osd-encryption-key-ocs-deviceset-gp2-1-data-0bd4n5
rook-ceph-osd-encryption-key-ocs-deviceset-gp2-2-data-0pzgmq
If there are no items in ocs yet, make sure that the OSD Pods have been started already.
|
As you can see some secret keys were generated for your OSDs in the storage cluster. They are stored in the HashiCorp Vault instance.
4. Granular PersistentVolume at-rest encryption
To use PersistentVolume encryption, it is required to setup a new storage class that will be configured to use the external Key Management System we have configured in the previous sectons of this guide.
4.1. Specific storage class
Navigate to the Storage → Storage Classes menu.
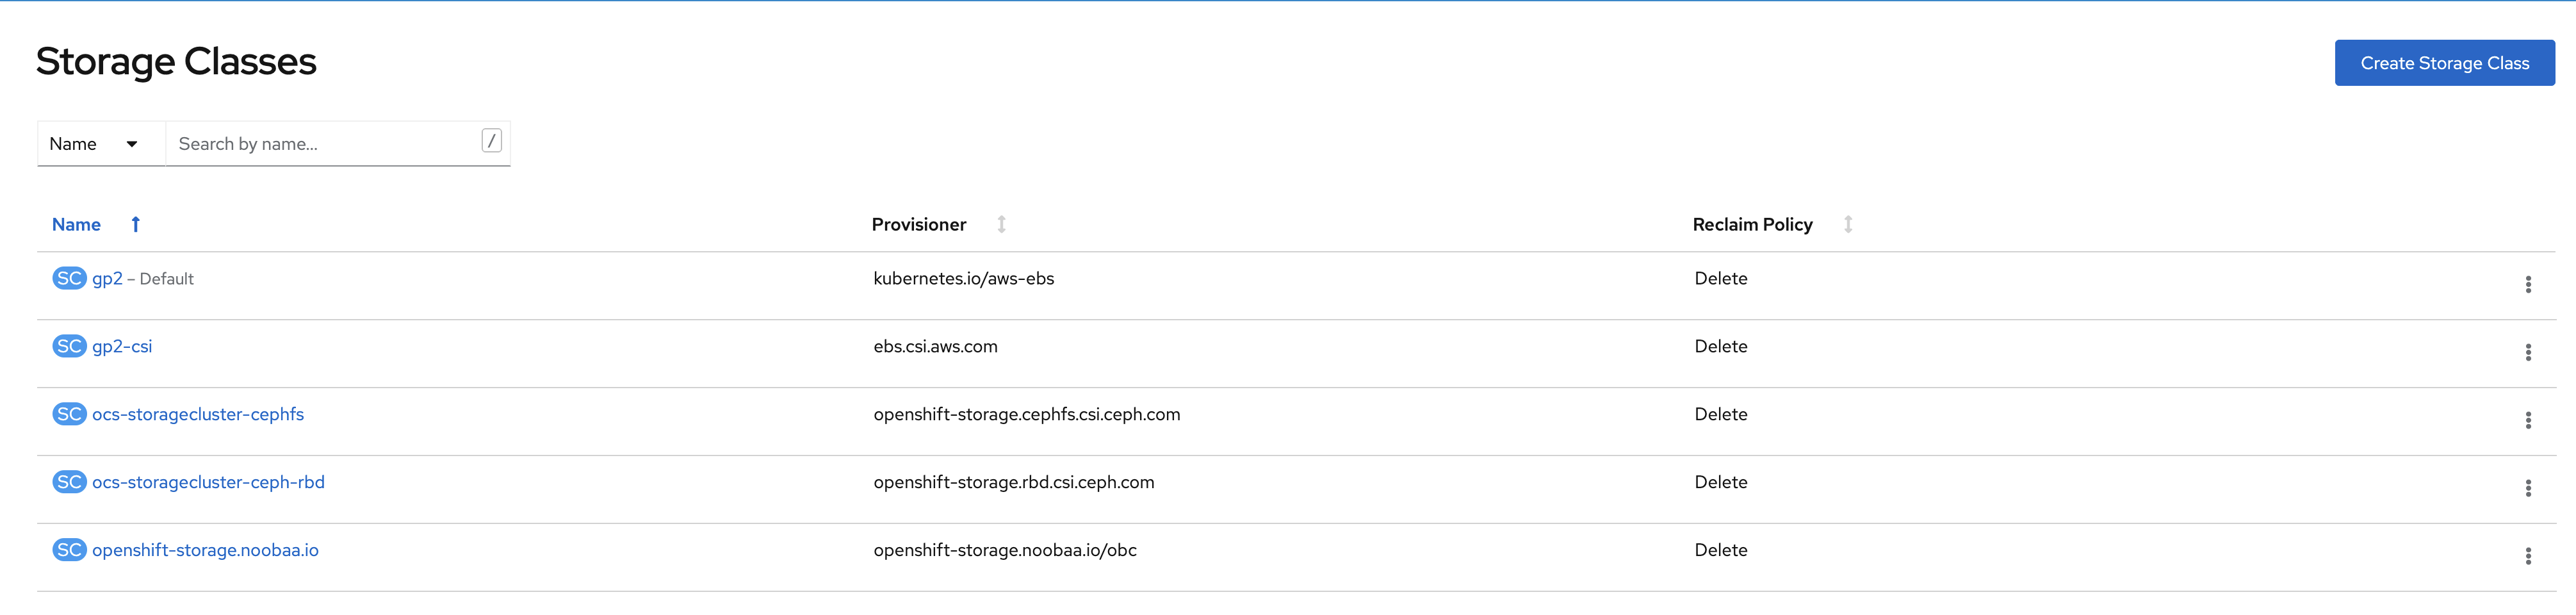
Click Create Storage Class in the top right of the UI.
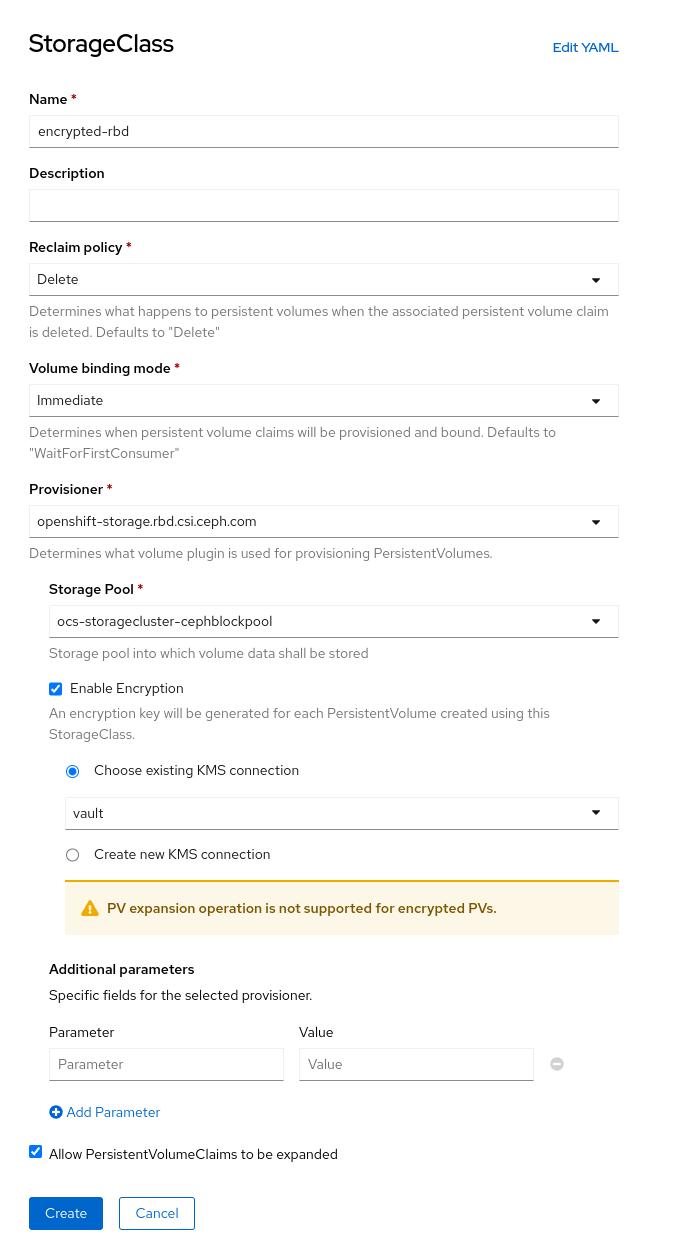
Enter the details for your new storage class as detailed below.
-
Specify the name of your storage class
-
Select the Ceph CSI RBD provisioner
-
Choose the Ceph pool receiving the PersistentVolumes
-
Enable encryption for this storage class and chose our existing KMS.
| The pool can be the same as the default pool. |
| CephFS based PV encryption is not yet available. |
Click Create in the UI.
4.2. Test application
Create a new project for your test application using the following command:
oc new-project my-rbd-storageNow using project "my-rbd-storage" on server "https://api.ocp45.ocstraining.com:6443".
You can add applications to this project with the 'new-app' command. For example, try:
oc new-app rails-postgresql-example
to build a new example application in Ruby. Or use kubectl to deploy a simple Kubernetes application:
kubectl create deployment hello-node --image=k8s.gcr.io/serve_hostnameCreate a secret to hold the vault access token specific to this project. Use the following template to create the secret.
---
apiVersion: v1
kind: Secret
metadata:
  name: ceph-csi-kms-token
  namespace: my-rbd-storage
stringData:
  token: "{application_vault_token}"
Replace {application_vault_token} with a Vault token. For security purposes you should consider creating different tokens for every namespace. For development purposes you can use the ODF token you created above.
Deploy your application using the dedicated storage class you just created. Use the following command to do so:
cat <<EOF | oc create -f -
---
kind: PersistentVolumeClaim
apiVersion: v1
metadata:
  name: pvc-cephrbd1
  namespace: my-rbd-storage
spec:
  accessModes:
    - ReadWriteOnce
  resources:
    requests:
      storage: 500Gi
  storageClassName: encrypted-rbd
---
kind: PersistentVolumeClaim
apiVersion: v1
metadata:
  name: pvc-cephrbd2
  namespace: my-rbd-storage
spec:
  accessModes:
    - ReadWriteOnce
  resources:
    requests:
      storage: 500Mi
  storageClassName: encrypted-rbd
---
apiVersion: batch/v1
kind: Job
metadata:
  name: batch2
  namespace: my-rbd-storage
  labels:
    app: batch2
spec:
  template:
    metadata:
      labels:
        app: batch2
    spec:
      restartPolicy: OnFailure
      containers:
      - name: batch2
        image: amazon/aws-cli:latest
        command: ["sh"]
        args:
          - '-c'
          - 'while true; do echo "Creating temporary file"; export mystamp=$(date +%Y%m%d_%H%M%S); dd if=/dev/urandom of=/mnt/file_${mystamp} bs=1M count=1; echo "Copying temporary file"; cp /mnt/file_${mystamp} /tmp/file_${mystamp}; echo "Going to sleep"; sleep 60; echo "Removing temporary file"; rm /mnt/file_${mystamp}; done'
        volumeMounts:
        - name: tmp-store
          mountPath: /tmp
        - name: tmp-file
          mountPath: /mnt
      volumes:
      - name: tmp-store
        persistentVolumeClaim:
          claimName: pvc-cephrbd1
          readOnly: false
      - name: tmp-file
        persistentVolumeClaim:
          claimName: pvc-cephrbd2
          readOnly: false
EOFpersistentvolumeclaim/pvc-cephrbd1 created
persistentvolumeclaim/pvc-cephrbd2 created
job.batch/batch2 createdVerify the status of the application and its different components.
oc describe pod[...]
Volumes:
tmp-store:
Type: PersistentVolumeClaim (a reference to a PersistentVolumeClaim in the same namespace)
ClaimName: pvc-cephrbd1
ReadOnly: false
tmp-file:
Type: PersistentVolumeClaim (a reference to a PersistentVolumeClaim in the same namespace)
ClaimName: pvc-cephrbd2
ReadOnly: false
default-token-rghg5:
Type: Secret (a volume populated by a Secret)
SecretName: default-token-rghg5
Optional: false
QoS Class: BestEffort
Node-Selectors: <none>
Tolerations: node.kubernetes.io/not-ready:NoExecute op=Exists for 300s
node.kubernetes.io/unreachable:NoExecute op=Exists for 300s
Events:
Type Reason Age From Message
---- ------ ---- ---- -------
Warning FailedScheduling 8m45s default-scheduler 0/6 nodes are available: 6 pod has unbound immediate PersistentVolumeClaims.
Warning FailedScheduling 8m45s default-scheduler 0/6 nodes are available: 6 pod has unbound immediate PersistentVolumeClaims.
Normal Scheduled 8m42s default-scheduler Successfully assigned my-rbd-storage/batch2-n4cqv to ip-10-0-202-113.us-east-2.compute.internal
Normal SuccessfulAttachVolume 8m43s attachdetach-controller AttachVolume.Attach succeeded for volume "pvc-f884eadc-9d37-4111-85ea-123c78b646a7"
Normal SuccessfulAttachVolume 8m43s attachdetach-controller AttachVolume.Attach succeeded for volume "pvc-93affaed-40f4-4fba-b907-53fbeefbd03f"
Normal AddedInterface 8m24s multus Add eth0 [10.128.2.19/23]
Normal Pulling 8m23s kubelet Pulling image "amazon/aws-cli:latest"
Normal Pulled 8m23s kubelet Successfully pulled image "amazon/aws-cli:latest" in 563.111829ms
Normal Created 8m23s kubelet Created container batch2
Normal Started 8m23s kubelet Started container batch2oc get pvcNAME STATUS VOLUME CAPACITY ACCESS MODES STORAGECLASS AGE
pvc-cephrbd1 Bound pvc-93affaed-40f4-4fba-b907-53fbeefbd03f 500Gi RWO encrypted-rbd 9m30s
pvc-cephrbd2 Bound pvc-f884eadc-9d37-4111-85ea-123c78b646a7 500Mi RWO encrypted-rbd 9m30sYou can also verify that the HashiCorp Vault scret engine now contains two PersistentVolume specific keys.
Open a remote shell on one of the Vault Pods
oc exec -ti vault-0 -n vault -- shThen login as the root, using the Token you got when initializing the Vault cluster
vault loginToken (will be hidden):
Success! You are now authenticated. The token information displayed below
is already stored in the token helper. You do NOT need to run "vault login"
again. Future Vault requests will automatically use this token.
Key Value
--- -----
token s.t1yycIXXXXXXXX
token_accessor qLxxdspcAYQoOnQsgquC6PY2
token_duration ∞
token_renewable false
token_policies ["root"]
identity_policies []
policies ["root"]List all Keys in the ocs path.
vault kv list ocsKeys
---
0001-0011-openshift-storage-0000000000000001-c27dc662-9ae1-11ec-8efb-0a580a80020a
0001-0011-openshift-storage-0000000000000001-c28f1e08-9ae1-11ec-8efb-0a580a80020a
NOOBAA_ROOT_SECRET_PATH/
rook-ceph-osd-encryption-key-ocs-deviceset-gp2-0-data-08p9p4
rook-ceph-osd-encryption-key-ocs-deviceset-gp2-1-data-0bd4n5
rook-ceph-osd-encryption-key-ocs-deviceset-gp2-2-data-0pzgmq| When deleting your application make sure you delete your application pods and PVCs before deleting the secret that contains your access token to the vault. If you fail to do so you will end up with orphans PV keys in your vault. |
5. Granular PersistentVolume at-rest encryption without cluster-wide encryption: Kubernetes Auth Method - ServiceAccounts
| The following steps will be supported and further integrated with ODF 4.10. Following the below steps on a cluster before 4.10 will most likely result in an unsupported configuration. |
Before ODF can use external Vault with service account tokens, we have to configure the authentcation method and Vault roles and policies. Details of the Kubernetes Authentication Method are out of scope for this document but are well explained by Vault Integration Using Kubernetes Authentication Method. In addition, Hashicorp Vault provides tutorials on general integration between Vault and Kubernetes.
This section outlines steps for using an external Vault instance with the following configuration options:
-
Vault instance external the Openshift cluster
-
Openshift ServiceAccount token is used to authenticate with Vault via the Kubernetes Authentication method
-
Vault namespace for reading/writing secrets used for encryption (optional)
-
Secrets engine not enabled under Vault namespace but to a different path (optional)
-
Vault Backend is kv v2 (optional)
-
HTTPS (optional)
-
Vault Certificate Authority verified (optional)
Please gather the following information and verify the following:
-
Your Vault Address (i.e. vault.myvault.com:8200)
-
Ensure your Vault instance has access to your cluster api endpoint.
-
Access to configure Vault auth, policies and secrets engine enablement or via a Vault administrator.
-
If you are verifying the Vault CA certificate, please have your Vault CA cert (PEM) available as you will need to base64 encode this cert in a secret. Detailed steps below.
5.1. ServiceAccounts, bindings and roles
Setup for using Kubernetes Authentication method must be configured before ODF can authenticate with and start using Vault. The instructions below create and configure ServiceAccounts, ClusterRole and ClusterRoleBinding required to allow ODF default ServiceAccount to authenticate with Vault.
Apply the following to your Openshift cluster:
---
apiVersion: v1
kind: ServiceAccount
metadata:
  name: rbd-csi-vault-token-review
---
kind: ClusterRole
apiVersion: rbac.authorization.k8s.io/v1
metadata:
  name: rbd-csi-vault-token-review
rules:
  - apiGroups: ["authentication.k8s.io"]
    resources: ["tokenreviews"]
    verbs: ["create", "get", "list"]

---
kind: ClusterRoleBinding
apiVersion: rbac.authorization.k8s.io/v1
metadata:
  name: rbd-csi-vault-token-review
subjects:
  - kind: ServiceAccount
    name: rbd-csi-vault-token-review
    namespace: default
  - kind: ServiceAccount
    name: default
    namespace: openshift-storage
  - kind: ServiceAccount
    name: rook-csi-rbd-plugin-sa
    namespace: openshift-storage
  - kind: ServiceAccount
    name: rook-csi-rbd-provisioner-sa
    namespace: openshift-storage
roleRef:
  kind: ClusterRole
  name: rbd-csi-vault-token-review
  apiGroup: rbac.authorization.k8s.io
5.2. Configure/Verify Vault Authentication
As mentioned in the previous step, setup for using Kubernetes Authentication method must be configured before ODF can authenticate with and start using Vault. In addition to the previous step, ensure Vault has the right roles and policies created by apply the steps below.
The steps below assume you have root access to Vault. If you do not have root access to Vault (i.e. Vault is administered by another team) please forward these instructions to your Vault administrator.
---
apiVersion: policy/v1beta1
kind: PodSecurityPolicy
metadata:
  name: rbd-csi-vault-token-review-psp
spec:
  fsGroup:
    rule: RunAsAny
  runAsUser:
    rule: RunAsAny
  seLinux:
    rule: RunAsAny
  supplementalGroups:
    rule: RunAsAny
  volumes:
    - 'configMap'
    - 'secret'

---
kind: Role
apiVersion: rbac.authorization.k8s.io/v1
metadata:
  namespace: openshift-storage
  name: rbd-csi-vault-token-review-psp
rules:
  - apiGroups: ['policy']
    resources: ['podsecuritypolicies']
    verbs: ['use']
    resourceNames: ['rbd-csi-vault-token-review-psp']

---
kind: RoleBinding
apiVersion: rbac.authorization.k8s.io/v1
metadata:
  name: rbd-csi-vault-token-review-psp
  namespace: openshift-storage
subjects:
  - kind: ServiceAccount
    name: rbd-csi-vault-token-review
    namespace: openshift-storage
roleRef:
  kind: Role
  name: rbd-csi-vault-token-review-psp
  apiGroup: rbac.authorization.k8s.io
5.3. Configure/Verify Vault Policies for ODF
The following step requires customization to your exact environment. Please do not apply to your cluster until after making all necessary changes. Details for each configuration option are below.
---
apiVersion: v1
kind: Service
metadata:
  name: vault
  labels:
    app: vault-api
spec:
  ports:
    - name: vault-api
      port: 8200
  clusterIP: None
  selector:
    app: vault
    role: server

---
apiVersion: apps/v1
kind: Deployment
metadata:
  name: vault
  labels:
    app: vault
    role: server
spec:
  replicas: 1
  selector:
    matchLabels:
      app: vault
      role: server
  template:
    metadata:
      labels:
        app: vault
        role: server
    spec:
      containers:
        - name: vault
          image: docker.io/library/vault:latest
          imagePullPolicy: "IfNotPresent"
          securityContext:
            runAsUser: 100
          env:
            - name: VAULT_DEV_ROOT_TOKEN_ID
              value: sample_root_token (1)
            - name: SKIP_SETCAP
              value: any
          livenessProbe:
            exec:
              command:
                - pidof
                - vault
            initialDelaySeconds: 5
            timeoutSeconds: 2
          ports:
            - containerPort: 8200
              name: vault-api
---
apiVersion: v1
items:
  - apiVersion: v1
    data:
      init-vault.sh: |
        set -x -e

        timeout 300 sh -c 'until vault status; do sleep 5; done'

        # login into vault to retrieve token
        vault login ${VAULT_DEV_ROOT_TOKEN_ID}

        # enable kubernetes auth method under specific path:
        vault auth enable -path="/${CLUSTER_IDENTIFIER}" kubernetes

        # write configuration to use your cluster
        vault write auth/${CLUSTER_IDENTIFIER}/config \
          token_reviewer_jwt=@${SERVICE_ACCOUNT_TOKEN_PATH}/token \
          kubernetes_host="${K8S_HOST}" \
          kubernetes_ca_cert=@${SERVICE_ACCOUNT_TOKEN_PATH}/ca.crt

        # create policy to use keys related to the cluster
        vault policy write "${CLUSTER_IDENTIFIER}" - << EOS
        path "secret/data/ceph-csi/*" {
          capabilities = ["create", "update", "delete", "read", "list"]
        }

        path "secret/metadata/ceph-csi/*" {
          capabilities = ["read", "delete", "list"]
        }

        path "sys/mounts" {
          capabilities = ["read"]
        }
        EOS

        # create a role
        vault write "auth/${CLUSTER_IDENTIFIER}/role/${PLUGIN_ROLE}" \
            bound_service_account_names="${SERVICE_ACCOUNTS}" \
            bound_service_account_namespaces="${SERVICE_ACCOUNTS_NAMESPACE}" \
            kubernetes_ca_cert=@${SERVICE_ACCOUNT_TOKEN_PATH}/ca.crt \
            policies="${CLUSTER_IDENTIFIER}"

        # disable iss validation
        # from: external-secrets/kubernetes-external-secrets#721
        vault write auth/kubernetes/config \
          kubernetes_host="${K8S_HOST}" \
          kubernetes_ca_cert=@${SERVICE_ACCOUNT_TOKEN_PATH}/ca.crt \
          disable_iss_validation=true
    kind: ConfigMap
    metadata:
      creationTimestamp: null
      name: init-scripts
kind: List
metadata: {}

---
apiVersion: batch/v1
kind: Job
metadata:
  name: vault-init-job
spec:
  parallelism: 1
  completions: 1
  template:
    metadata:
      name: vault-init-job
    spec:
      serviceAccount: rbd-csi-vault-token-review
      volumes:
        - name: init-scripts-volume
          configMap:
            name: init-scripts
      containers:
        - name: vault-init-job
          image: docker.io/library/vault:latest
          volumeMounts:
            - mountPath: /init-scripts
              name: init-scripts-volume
          env:
            - name: HOME
              value: /tmp
            - name: CLUSTER_IDENTIFIER
              value: kubernetes
            - name: SERVICE_ACCOUNT_TOKEN_PATH
              value: /var/run/secrets/kubernetes.io/serviceaccount
            - name: K8S_HOST
              value: https://{your_openshift_APIServer_external_endpoint} (2)
            - name: PLUGIN_ROLE
              value: csi-kubernetes
            - name: SERVICE_ACCOUNTS
              value: rbd-csi-nodeplugin,rbd-csi-provisioner,csi-rbdplugin,csi-rbdplugin-provisioner,rook-csi-rbd-provisioner-sa,rook-csi-rbd-plugin-sa
            - name: SERVICE_ACCOUNTS_NAMESPACE
              value: openshift-storage
            - name: VAULT_ADDR
              value: {your_vault_url} (3)
            - name: VAULT_DEV_ROOT_TOKEN_ID
              value: sample_root_token (1)
          command:
            - /bin/sh
            - /init-scripts/init-vault.sh
          imagePullPolicy: "IfNotPresent"
restartPolicy: Never| 1 | Replace with a Vault token that allows policy creation. This token is only used during Vault configuration and may be revoked after the job above completes. |
| 2 | Replace with your Openshift API server external endpoint. (i.e. api.ocp47.myopenshift.com:6443) |
| 3 | Replace with your vault url. (i.e. vault.myvault.com:8200/) |
Verify the job in the yaml above completed without error:
oc -n openshift-storage get pods | grep vault-init
oc -n openshift-storage logs pods/{POD from previous command}
5.4. Create an Encrypted StorageClass
In order to create a storageclass that uses our external Vault, we must create and configure a configmap named csi-kms-connection-details that will hold all the information needed to establish the connect. Our storageclass needs to contain the field "encryptionKMSID" whose value is used as a lookup into cm/csi-kms-connection-details.
Create the csi-kms-connection-detail configmap by applying the yaml below. If you change "vault-test" to a more meaningful name for your environment please do not forget to also use your new name in the storageclass encryptionKMSID field in your new storageclass.
---
apiVersion: v1
kind: ConfigMap
data:
  vault-test : |- (1)
    {
      "encryptionKMSType": "vault",
      "vaultAddress": "{URL to your vault address, http or https, and port}", (2)
      "vaultAuthPath": "/v1/auth/kubernetes/login",
      "vaultRole": "csi-kubernetes",
      "vaultPassphraseRoot": "/v1/secret",
      "vaultPassphrasePath": "ceph-csi/",
      "vaultCAVerify": "true" (3)
    }
metadata:
name: csi-kms-connection-details| 1 | You may change vault-test to a more meaningful name for your environment. Just remember to use the same value for encryptionKMSID in your StorageClass. |
| 2 | Replace with your Vault URL. |
| 3 | Change to "false" if your Vault CA should not be verified. |
Create a StorageClass that uses the service account for authentication.
allowVolumeExpansion: false
apiVersion: storage.k8s.io/v1
kind: StorageClass
metadata:
  name: {NEW STORAGECLASS NAME} (1)
parameters:
  clusterID: openshift-storage
  csi.storage.k8s.io/controller-expand-secret-name: rook-csi-rbd-provisioner
  csi.storage.k8s.io/controller-expand-secret-namespace: openshift-storage
  csi.storage.k8s.io/fstype: ext4
  csi.storage.k8s.io/node-stage-secret-name: rook-csi-rbd-node
  csi.storage.k8s.io/node-stage-secret-namespace: openshift-storage
  csi.storage.k8s.io/provisioner-secret-name: rook-csi-rbd-provisioner
  csi.storage.k8s.io/provisioner-secret-namespace: openshift-storage
  encrypted: "true"
  encryptionKMSID: vault-test (2)

  imageFeatures: layering
  imageFormat: "2"
  pool: ocs-storagecluster-cephblockpool
provisioner: openshift-storage.rbd.csi.ceph.com
reclaimPolicy: Delete
volumeBindingMode: Immediate| 1 | Replace with what you would like to call your new storageclass. |
| 2 | Make sure this value matches the entry in cm/csi-kms-connection-details you want this storageclass to use. See item 1 in the yaml for cm/csi-kms-connect-details above. |
5.5. Create a PVC using this StorageClass
Apply the following to create PVC using your new storageclass that uses the Kubernetes Auth Method with Vault:
apiVersion: v1
kind: PersistentVolumeClaim
metadata:
  name: {PVC NAME} (1)
  namespace: {YOUR NAMESPACE} (2)
spec:
  accessModes:
  - ReadWriteOnce
  resources:
    requests:
      storage: 1Gi
  storageClassName: {NEW STORAGECLASS NAME} (3)
volumeMode: Filesystem| 1 | Name your new PVC |
| 2 | Replace with your desired namespace |
| 3 | Replace with the storageclass name you previously created. |
Your PVC should bind within seconds. If your PVC is stuck in Pending review the events and logs for possible reasons. Look for mismatches between namespace, sa and Vault policy and role.
If you need to troubleshoot, try these steps:
oc -n openshift-storage run tmp --rm -i --tty --serviceaccount=rook-csi-rbd-plugin-sa --image ubi8:latestTo start a container with attached SA rook-csi-rbd-plugin-sa. Install jq (yum install jq) and run the following to verify the rook-csi-rbd-plugin-sa can retrieve a vault client token:
export VAULT_ADDR={VAULT ADDR i.e. https://vault.myvault.com:8200}
export KUBE_TOKEN=$(cat /var/run/secrets/kubernetes.io/serviceaccount/token)
export VT=$(curl -s --request POST --data '{"jwt": "'"$KUBE_TOKEN"'", "role": "csi-kubernetes"}' $VAULT_ADDR/v1/auth/kubernetes/login | jq -r '.auth.client_token')
echo $VT
If the last command above did not return any value, there is a mismatch between the SA and namespace the pod is running as, and how the Vault policy was configured. Double check your configuration for typos.